.
Garden Diary - April
All content included on this site such as text, graphics and images is protected by U.S and international copyright law.
The compilation of all content on this site is the exclusive property of the site copyright holder.
Container Gardening, an NYBG Plant Studio Course
Week Four, Maintaining Your Container Garden
Week 4 Overview
begins with a very lucid and informative presentation by Mobee Weinstein,
presenter for week four of the Plant Studio's Container Gardening course.
Week 4, Part 1 Maintaining Your Container Garden: Keeping Up with Your Containers

image courtesy of the New York Botanical Gardens, all rights reserved
Clippers and scissors to cut, string and jute to tie, stakes for support. And a bucket or a
a basket, a trug to collect all the debris after you are done pinching, clipping, pruning.
Pinching, we are told, is the removal of plant buds to encourage branching and create a fuller plant.
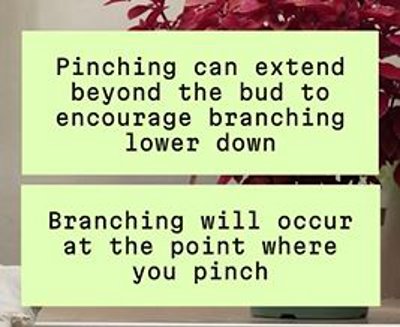
image courtesy of the New York Botanical Gardens, all rights reserved

image courtesy of the New York Botanical Gardens, all rights reserved
Week 4, Part 2 Maintaining Your Container Garden: Deadheading Flowering Plants
Mobee describes just what to do and why, how to do it, and then demonstrates these maintainence techniques.
She points out these plant care techniques are necessary not just for container plants but also garden perennials.
How often? At least weekly (once a month lets problems get beyond you) for dead, damaged, diseased plant parts.
There's "dead-leafing" which just like it sounds, meaning removing old, tired leaves. Removing old fading flowers
encourages additional new flowers especially on annuals. Lastly, pinching is pruning used for tender new growth.
Week 4, Part 3 Maintaining Your Container Garden: When and How to Repot a Plant - Potting Up

image courtesy New York Botanical Garden all rights reserved
It makes more sense if you understand why, when, and how to pot up a plant growing in a container. Move a plant's pot up a size at a time, for example shift a plant in a 6 inch diameter pot to an 8 inch diameter pot. Unpot, loosen roots, pot a piece of screening or thin paper towel over the drainage hole. Add some soil, see that the plant will be at the proper height in its new pot, then add more soil between root ball and wall of >new pot. Tamp lightly to eliminate any air pockets. Use a pencil to write useful information on a label. Then water until some water drains at the bottom of the pot, being sure to water pot and soil, not the plant.
You'd think this is enough information for this segment but Mobee has more tidbits to share. She quickly describes and demonstrate techniques such as double potting, wicking, using decorative cache pots. Done? Not quite. Group plants for decorative appeal and localized increase in humidity, perhaps using a humidity tray, and even demonstrates using a glass cloche as a terrarium, a sort of tabletop greenhouse.
Week 4, Part 4 Maintaining Your Container Garden: Overwintering Outdoor Containers
If you live in a location where winters are cold, tropical plants will obviously not survive outdoors.
They will need to come into a greenhouse, a sun room, or at least indoors to a sunny window. Even if
cold hardy, think about the pot. Terracotta will spall and crack if the soil inside freezes and expands.
Plastic or resin pots are much more durable, Mobee points out. And there are techniques that will help.
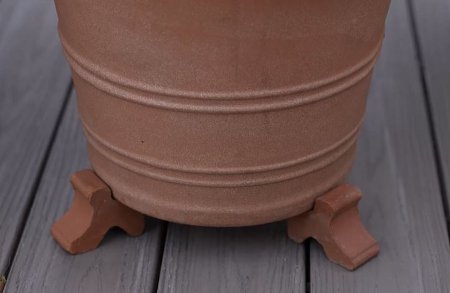
image courtesy New York Botanical Gardens, all rights reserved
Pot feet, raising the bottom of the pot off the ground, patio or terrace are a good idea year round.
The pot will drain well during the growing season, and will not freeze to the ground in winter's cold.
Use three pot feet, equally spaced, to nicely support the pot. Remember, three points define a plane.
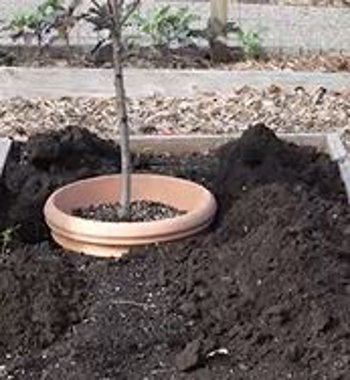
image courtesy New York Botanical Gardens, all rights reserved
Heeling in is a term used when burying pot and plant in the ground in winter to protect from freezing. Of course you need bare ground, not a site where plants are growing. And Mobee quipped that hopefully it would be as soft and easy to dig as her soil where she was demonstrating. If you are concerned about earth and/or organic matter staining the pot, slip it into a garbage bag before lowering it into the ground.
Mobee had a couple of good asides, advising listeners to put the heel of their foot on the shovel or spade's shoulder when digging as that is where your foot is stronger. Also, remember to bend your knee while digging, not your back.

image courtesy New York Botanical Gardens, all rights reserved
And if there is no plant-free, soft soil area, an alternative would be to pile mulch
all around the pot, being sure to cover well all the way up to the container's rim.
Other options and possibilities include wrapping the pot with fiberglass insulation (wear a breathing mask and eye protection), then using plastic to protect the fiberglass and its paper layer from damaging rain.
A very useful conclusion to a helpful class about container gardening indoors and outside.
There is a Reading and Resources list with links to the New York Botanical Garden's
LuEsther T. Mertz Library Guide. Several appropriate publications may be read online.
and in addition
There is a link for a field trip, a video tour of an NYBG production greenhouse, one acre in size.
See also Sample Final Project
Container Gardening, week three
Container Gardening, week two
and
Container Gardening, introduction and week one
Gratis registration for this Plant Studio course has been provided by the New York Botanical Garden
Back to Top
Back to April
Back to the main Diary Page